Take control of your digital footprint with this step-by-step walkthrough to stepping away from Meta’s platforms temporarily or permanently.
Choosing to step back from social media is one of the quickest ways to clear out mental clutter and regain control over your personal privacy. However, tech platforms rarely make leaving easy.
Because Facebook and Instagram are both part of the Meta ecosystem, their account management systems have been consolidated into a centralized menu called the Meta Accounts Center. While this sounds convenient, Meta frequently shuffles the submenus, turning a simple task into a frustrating scavenger hunt.
This guide provides a definitive, clear walkthrough to help you navigate these recent layout updates. Whether you want a brief digital detox or a permanent departure from mobile or desktop, here is how to get it done cleanly and securely.
Part 1: Deactivation vs. Deletion (The Crucial Difference)
Before you press a single button, you must decide whether you want a temporary break or a permanent split. Choosing the wrong option can result in losing years of memories or accidentally leaving your data exposed.
To help you decide, here is exactly what happens under each option:
| Feature | Deactivation (Temporary) | Deletion (Permanent) |
| Data Status | Hidden safely on Meta’s servers. | Permanently erased from active servers after a 30-day grace period. |
| Public Visibility | Your profile, photos, likes, and comments vanish completely from public view. | Everything vanishes from public view immediately. |
| How to Reverse It | Simply log back into your account using your standard credentials at any time. | Log back into your account within 30 days of filing the request to cancel it. |
| Associated Services | Keeps Facebook Messenger fully functional so you can still chat with friends. | Deletes Messenger, linked Threads profiles, Oculus/Meta Quest VR data, and game saves. |
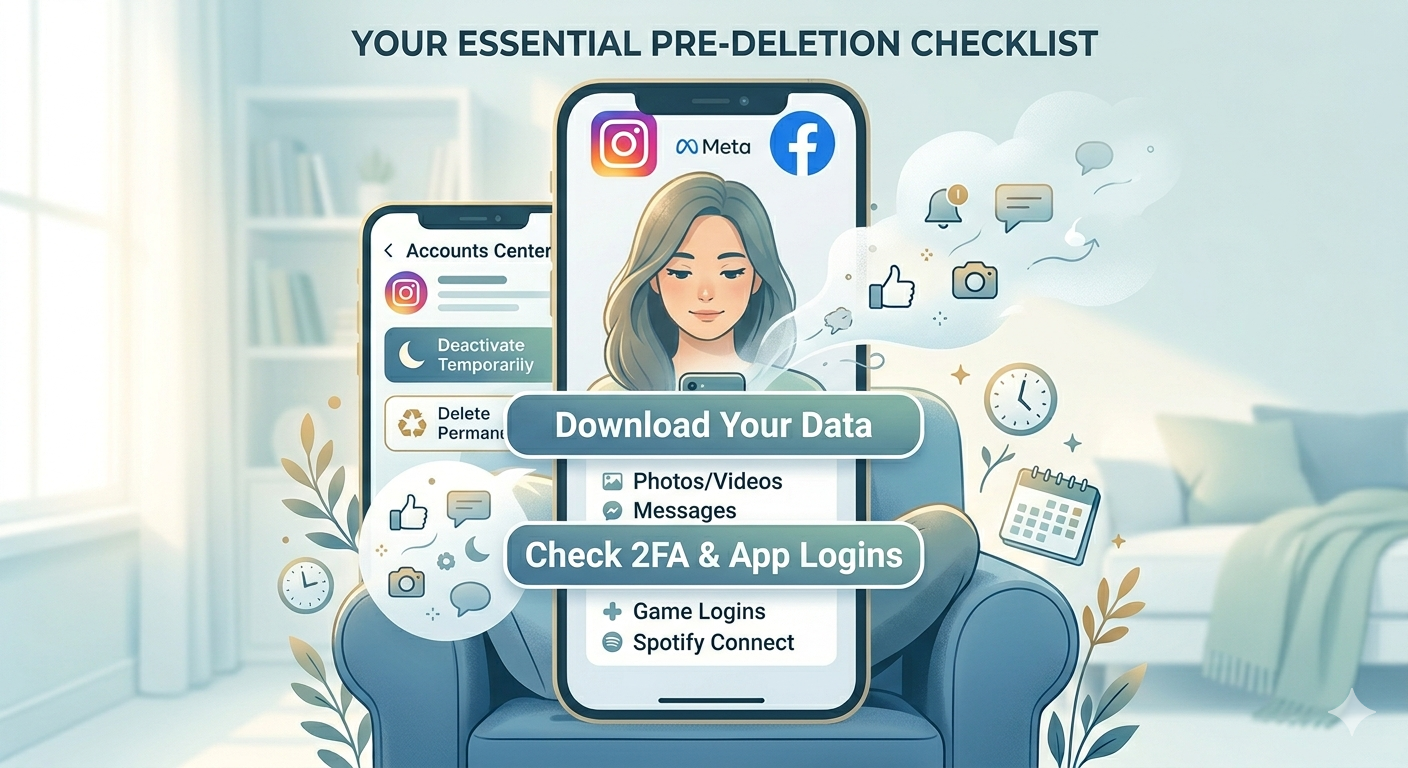
Part 2: Look Before You Leap (Essential Pre-Deletion Checklist)
If you choose permanent deletion, treat it like moving out of a house—you need to pack up your things before the demolition crew arrives. Take these three essential steps before moving forward:
Step A: Download Your Data Archive
Do not leave your photos, videos, and archived stories behind. You can request a complete file of your digital history by navigating to your Accounts Center, choosing Your information and permissions, and selecting Download your information.
💡 Tip: If you have years of media on your profile, it can take Meta anywhere from 24 to 48 hours to assemble the ZIP archive. Wait until you receive the email notification and successfully download this file before proceeding with account deletion.
Step B: Unlink Third-Party App Logins
Think about every website or mobile app where you clicked “Log in with Facebook” or “Log in with Instagram” (like Spotify, Pinterest, or fitness trackers). If you delete your Meta account, you lock yourself out of those external platforms. Before deleting your account, log into those external services individually and update your security settings to link them to a standard email address and password.
Step C: Turn Off or Secure Your Backup Codes
If you use Two-Factor Authentication (2FA), make sure you have your physical backup recovery codes saved. If you change your mind during the 30-day grace period, a 2FA glitch can sometimes trap you in a login loop, preventing you from stopping the deletion clock.
Part 3: How to Deactivate or Delete Instagram
Meta’s mobile applications occasionally display different layouts depending on your software version. The steps below account for both layout styles to ensure you do not get stuck.
Method A: Via the Mobile App (iOS & Android)
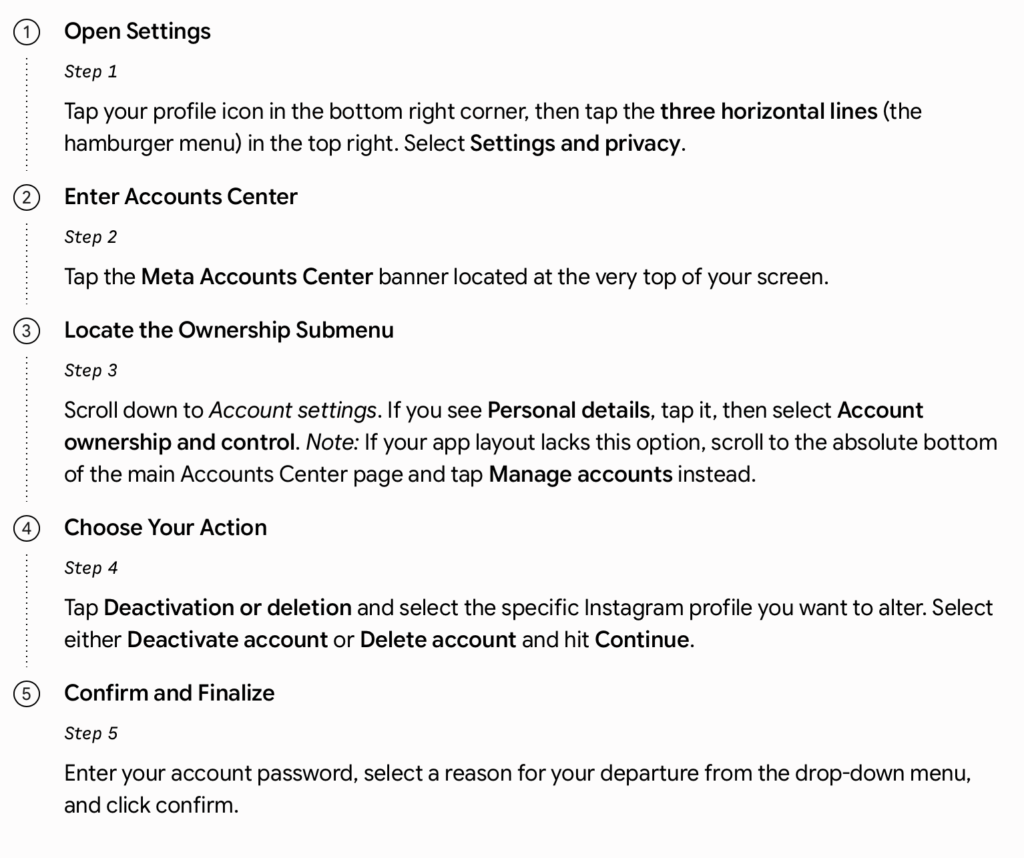
Open Settings
Step 1
Tap your profile icon in the bottom right corner, then tap the three horizontal lines (the hamburger menu) in the top right. Select Settings and privacy.
Enter Accounts Center
Step 2
Tap the Meta Accounts Center banner located at the very top of your screen.
Locate the Ownership Submenu
Step 3
Scroll down to Account settings. If you see Personal details, tap it, then select Account ownership and control. Note: If your app layout lacks this option, scroll to the absolute bottom of the main Accounts Center page and tap Manage accounts instead.
Choose Your Action
Step 4
Tap Deactivation or deletion and select the specific Instagram profile you want to alter. Select either Deactivate accountor Delete account and hit Continue.
Confirm and Finalize
Step 5
Enter your account password, select a reason for your departure from the drop-down menu, and click confirm.
⚠️ Threads Warning: Because Threads is deeply tied to the Instagram infrastructure, permanently deleting your Instagram account will automatically erase your associated Threads profile and data as well.
YouTube
Method B: Via a Desktop Web Browser
- Go to
Instagram.comand log into your profile. - Click the More icon (three horizontal lines) in the bottom-left sidebar menu, then click Settings.
- Click the unified Accounts Center box in the left-hand navigation panel.
- Follow the same path used on mobile: Click Personal details → Account ownership and control → Deactivation or deletion.
- Choose your profile, select your preferred action, enter your password, and click finalize.
Part 4: How to Deactivate or Delete Facebook
Stepping away from Facebook requires careful attention because it can affect external assets, such as business pages you manage or paid virtual reality purchases on Meta Quest devices.
Method A: Via the Mobile App
Navigate to the Menu
Step 1
Tap the Menu button (your profile picture with three horizontal lines) in the navigation bar. On iOS, this is at the bottom right; on Android, it sits at the top right.
Open Settings
Step 2
Scroll down, tap Settings & privacy, and choose Settings.
Access Meta Accounts Center
Step 3
Tap the Meta Accounts Center card located at the top of the interface.
Open Ownership Settings
Step 4
Scroll down to the Account settings section. Tap Personal details followed by Account ownership and control. (As with Instagram, if your menu looks different, scroll to the bottom of the page and select Manage accounts).
Select and Execute
Step 5
Tap Deactivation or deletion, choose your main Facebook account, select your path (Deactivate or Delete), type your password, and hit confirm.

Method B: Via a Desktop Web Browser
- Click your profile icon in the top right corner of
Facebook.com. - Click Settings & privacy, then select Settings.
- Look to the top left sidebar and click the Accounts Center panel.
- Click Personal details under the Account Settings heading, then select Account ownership and control.
- Select Deactivation or deletion, choose the account, pick your option, enter your password, and finish the process.
Part 5: Post-Deletion: The 30-Day Grace Period & Beyond
Once you click the final confirmation button to delete your account, your profile enters an incognito phase.
To the rest of the world, your account is already gone. Your friends cannot search for your profile, view your photos, or tag you in posts. However, Meta does not immediately drop your data into an electronic shredder.
Meta holds your files on a 30-day countdown timer. This grace period is designed to protect you in case your account was compromised by a hacker or you experience immediate sender’s remorse. If you change your mind at any point during these 30 days, simply go to the platform, log in with your normal username and password, and click Cancel Deletion.

What Happens After Day 30?
Once those 30 days expire, the door locks permanently. Your data is removed from Meta’s active operational servers. Keep in mind that Meta notes it can take up to 90 days from the initial request to clear your data completely from their backup storage systems, but this data is completely inaccessible to you and the public.
💬 The Chat History Exception: It is important to know that deleting your profile does not erase your side of private conversations from your friends’ accounts. Any direct messages or chat threads you sent over the years will remain visible within the recipient’s inbox, though your name and profile picture will be replaced by a generic “Instagram User” or “Facebook User” placeholder.
For a clearer understanding of how the menu layout looks on your device, watch this step-by-step video on How to Delete an Instagram Account. This visual demonstration highlights the exact buttons to tap within the updated settings menu to help you avoid getting lost in the submenus.